3D Tutorial

Second Picture is devoted to original tutorials about 3D graphics, Photoshop, Photography and Web Design.
Character Modeling Tutorials
3D Modeling a Human Head
23.10.2007 Category: 3D (Modeling) | Modeling Human Head in 3D Studio MAX 01/10
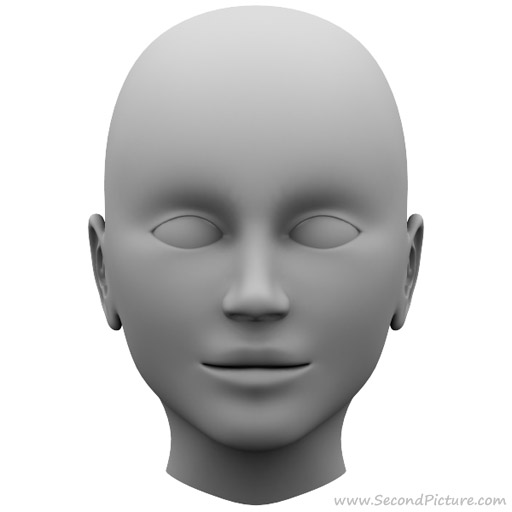
Picture 1. The end result could look for example like this. Notice that this is a stylized head which is not exactly realistic. For example the eyes are too big.
Human head is one of the most difficult subjects to model believably. The structure and form of a human face is so familiar to everyone that even a small fault in the 3D model is easy to notice.
This tutorial covers the 3D modeling of a human head in 3D Studio MAX using polygons. The head is modeled roughly using polygons. The head will get its final form when Meshsmooth modifier is added to it. When the Meshsmooth modifier is added to it the face becomes a so called subdivision surface. Subdivision surface means a surface which is created by dividing the original surface into smaller polygons. Meshmooth modifier does exactly this. This way the rough surface can be made rounder and smoother. The end results is a head similar to the one in picture 1. Notice that this is a stylized head which is not fully realistic. For example the eyes are too big and the ears have been simplified. However, I believe that this model could very well work as a basis for realistic geometry of a human head.
Topology, Edge loops and Poles

Picture 2. In the picture above you can see the polygon construction of the model. By seeing the construction of the model you can conclude how well the model is suited for animation.

Picture 3. The picture above is rendered so that you can see the Isolines of the Meshsmooth modifier.
In picture 2 and 3 you can see the topology and edge loops of the model. By seeing the structure of the model you can conclude how well the model is suited for animation. Edge loop means a row of edges that goes through successive four sided vertices. Four sided vertex is a vertex where four edges meet. In my opinion, in an ideal model that is made for animation edge loops are parallel or perpendicular to the movements of the muscles.
There are almost only four sided polygons (quads) in this model which is good if the model is going to be animated. One should always aim to construct the model from four sided polygons when modeling a character. There are naturally three sided and five sided poles in this model. A pole is a vertex where less or more than four edges meet. Pole ends an edge loop and might sometimes cause trouble in animation. If you want to know more about the subject I recommend reading Bay Raitt's instructions about 3D modeling and edge loops. Another great resource where to find more information about edge loops, head modeling and 3DS MAX is www.cgsociety.com.
3D Studio MAX Tools

Picture 4. Low polygon version of the human head. This is how the complete 3d model will look like before the Meshsmooth modifier is added.
Before starting the 3D modeling one should be familiar with the following concepts and 3DS MAX tools:
- Editable poly
- working in sub-object modes
- copying polygons
- weld
- cut
- extrude
- create
- Symmetry modifier
- Meshmooth modifier
- Basics about materials
Reference Pictures for the 3D Head

Picture 5. Reference pictures provide a lot of help when modeling a human head.
It's best to use real photographs as reference pictures when modeling a human head but if real photos are not available you can download pictures below.
Create reference pictures in 3D Studio MAX according to picture 5. Change Left view to Right view. Create two plane objects whose size is 512 x 512 (the same as the pixel dimensions of the pictures. It's relevant that the proportion between width and height is the same as in the pictures) and add textures to them. Set the Self-Illumination of the materials to 100 (material will become self illuminating and therefore is easier to see).
Prepare the Views
Turn on Smooth + Highlights (F3) and turn off grid (g) in all view ports. Set the width and height segments to one in both plane objects. The head is considerably easier to to create when we can model according to the reference pictures in the background.
Page 2: 3D Modeling a Mouth in 3DS MAX